Change Sound Settings in Windows 11: 8 Ways to Do
6 min read
Manage sound settings on Windows 11 to get better audio!
Unlike other Windows Operating systems (OS), Windows 11 has come up with many new features, especially to enhance (improve) the user experience.
However, there is a loop in the audio configuration, i.e., Microsoft hasn’t paid too much attention to the audio system of this OS.
Some professionals say that Windows 11 is meant to provide a personalized experience to users. That’s why Microsoft doesn’t do everything on its own; it offers the opportunity of customization to users.
So, if you are experiencing any Windows 11 sound issues, don’t panic. This blog will discuss 8 ways to manage sound settings in windows 11.
And by following the ways, you will be able to customize the Windows 11 sound settings according to your interest.
So, let’s get started!
How to Manage Sound Settings in Windows 11?
If you can manage the sound system properly, your system will provide immersive audio quality.
Furthermore, you can also enhance your gaming and movie experience.
So, try the 8 ways to manage sound settings in windows 11 that are mentioned below.
#1. Enable Spatial Sound on Windows 11
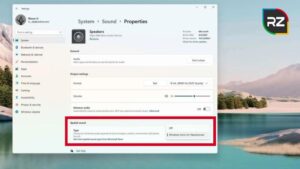
You need to enable spital sound to get an immersive audio experience while playing games and watching movies.
For that, follow the steps mentioned below:
- Open Settings > System > Sound.
- Look at the Output section and click on the Speakers settings.
- You’ll find the Spital Sound section. Here, go to the Windows Sonic for Headphones option.
- Now, go to the Type setting and turn it Off (optional).
Thus, this is how you can manage Windows 11 sound settings for an enhanced and better audio experience.
#2. Manage Sound Balance in Windows 11
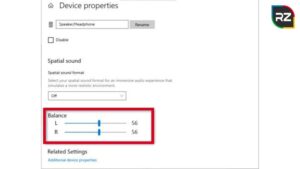
From the manage sound balance option in Windows 11, you can adjust the audio that plays on output devices accordingly.
Below are the steps to manage sound balance (left and right) on Windows 11:
- Open Settings > System > Sound.
- Look at the Output section and click on the Speakers settings.
- Under the Enhance Audio setting, click the Advanced option.
- Go to the Levels tab, and click the Balance button.
- Here, change the Volume Settings according to your need.
- Lastly, click Ok – Apply – Ok.
Thus, after completing this step, you can feel more balanced audio in your output device.
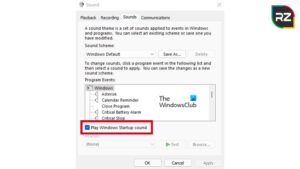
#3. How to Turn On/Off the Windows 11 Startup Sound?
Windows 11 has come up with the feature of startup sound that sounds perfect for some people.
However, some think that it disturbs the decorum of a place such as an office, library, etc.
Keeping that in mind, we have discussed both the steps, turn on/off startup sound.
Let’s start with the steps to turn On Windows 11 Startup sound!
Turn On the Windows 11 Startup Sound
Follow the steps to do so:
- Go to Settings > Personalization Category > Themes.
- Click on the Sound option.
- The Properties window will show.
- Go to Sound and find the checkbox with the “Play Windows Startup Sound” option (look down the Program events).
- Tap on the Checkbox to turn on the Windows 11 startup sound.
Now, if you don’t like it and want to turn it off, have a look at the next section.
Turn Off the Windows 11 Startup Sound
You can simply repeat the same steps that we have mentioned in the upper section. You just need to uncheck the corresponding box.
Or follow these steps to turn off the Windows 11 startup sound:
- Go to Settings > Personalization Category > Themes.
- Click on the Sound option.
- The Properties window will display.
- Go to Sound and find the Checkbox with the “Play Windows Startup Sound” option.
- Uncheck the corresponding box.
Thus, by using these steps, anyone can manage sound settings in windows 11 to easily turn on/off the Windows 11 startup sound.
#4. Control the System Volume in Windows 11

If you have multiple audio devices in your system and want to control them individually, you can control them from the sound control panel Windows 11.
Follow these steps to control the system volume in Windows 11:
- Open Settings > System > Sound (Also, open Sound settings from the Windows 11 sound settings shortcut in the right corner).
- Under the Output section, find the Volume Slider and use it to Control the System Volume.
- Go to the Advance section and tap the Volume Mixer option.
- Under the Apps section, use the System Sound Sliders to manage the volume (increase or decrease volume).
Thus, you can manage sound settings in Windows 11 for every input or output device.
#5. Disable Audio Output in Windows 11
Disabling audio output in Windows 11 is easy as you don’t need to uninstall it from your system.
Here are the steps you can follow to do so:
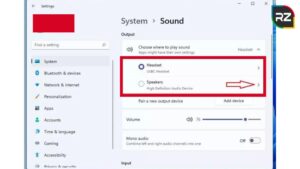
- Open Settings > System > Sound (You can also right-click on the Speaker Icon and go to Sound Settings).
- Under the Output section, you’ll find the Speaker option.
- Click the Sideways Caret (arrow) right side of the Speaker option.
- Now, under the General section, tap on the Don’t Allow button (right side on the Audio option).
Thus, this way, you can disable a sound device on Windows 11. To check if it really works, reopen the Windows 11 Sound Setting again. And if you don’t find the device there, you can confirm that the device is disabled.
In contrast, if you want to enable audio output in Windows 11, you can follow the steps discussed in the coming section.
#6. Enable Audio Output in Windows 11
From the above section, you can disable an audio output in Windows 11 to manage sound settings in Windows 11.
However, you need to follow a slightly different procedure to enable it again.
Follow the steps to enable audio output in Windows 11:
- Open Settings > System > Sound (Open sound settings).
- Find the Advance option by scrolling down the page,
- Click on the All Sound Devices option.
- Here, you’ll find a List of Output Audio Devices.
- From the list of output devices, Choose the Device you want to enable.
- On the Properties Page, click on the Allow button (right side of the Audio option, under the General section).
Thus, by following this process, you can enable the disabled audio device again in Windows 11.
#7. How to Enable or Disable Mono Audio in Windows 11?
Mono audio stands for “one sound.” In simple terms, it refers to having only one audio signal from just one audio channel/device for playback or recording.
Moreover, it is beneficial for places with multiple-audio channels like clubs, party halls, and more as it avoids phase-cancellation issues.
So, to enable mono audio in Windows 11, follow the steps mentioned below:
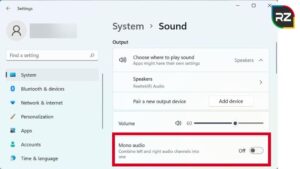
- Go to Settings > System > Sound.
- Under the Output section, you’ll find the Mono Audio option.
- Use the Toggle Switch to enable or disable Mono Audio.
As said, mono audio is not recommended for everyone, so enable or disable it according to your needs and interest; however, you want to Windows 11 audio settings.
#8. Enable or Disable Enhanced Audio in Windows 11
Unlike other updates, Windows 11 offers additional audio features to its users.
For instance, you can improve sound quality with a loudness equalizer, room correction, windows 11 bass boost, switch speakers configuration windows left right, and virtual surround.
To leverage the feature, look at the steps on how to enable this Windows 11 feature.
Enable Advance Audio in Windows 11
Here are the steps to enable the enhanced audio feature in Windows 11:
- Open Sound Settings (Go to Settings > System > Sound).
- Click the Speaker option, under the Output section.
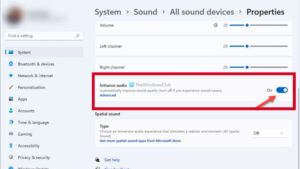
- On the Properties page, find the Enhance Audio option under Output Settings.
- Use the Toggle Switch to enable the Enhance Audio.
- Tap on the Advance option.
- Now, check the Sound Enhancement Feature (Bass Boost, Virtual Surround, Room Correction, Loudness Equalization).
- Lastly, click Apply and then, Ok.
After completing the steps, you’ll notice enhanced Windows 11 audio settings (improved audio quality).
However, some people like this feature to manage sound settings in Windows 11, and some don’t.
So, from the following section, you’ll find a way to disable the enhanced audio feature in Windows 11.
Disable Enhance Audio in Windows 11
Here are the steps to disable enhanced audio in Windows 11:
- Go to Settings > System > Sound.
- Click the Speaker option, under the Output section.
- On the Properties page, find the Enhance Audio option under Output Settings.
- Use the Toggle Switch to disable the Enhance Audio.
Hence, these are the ways to manage sound settings in windows 11. Use these ways to customize Windows 11 audio according to your needs.
Conclusion
Windows 11 comes up with many features, including pleasing sound.
Yet, if you want to customize it, you can follow the steps on how to reset all audio settings in Windows 11 (manage) that we have mentioned above.
After managing Windows audio settings, enjoy the operating system with your new, personalized audio system.
Hope you find this blog interesting and informative. Let us know in the comment below.