How to Enable Secure Boot on Windows 11?
5 min read
You have to enable secure boot on Windows 11 to add multi-layered security to the operating system (OS).
Microsoft has come up with a new update of Windows (Windows 11), and in this update, enabling secure boot is necessary.
This is because the Windows 11 update is meant to provide excellent security to the users from cyber criminals or hackers.
However, it is not compulsory to enable secure boot in other OS like Windows 8, 9, and 10.
And if you do so, you may notice that windows 10 won’t boot with secure boot enabled; it’s one of the most Windows 10 common issues.
But if you are a Windows 10 user and want to update to Windows 11, you need to enable Secure boot first.
Therefore, this blog will discuss a step-by-step guide to enable secure boot on Windows 11 MSI.
But before that, let’s first understand secure boot and its works in the next section!
What is Secure Boot and How Does it Work?
Here is the introduction of secure boot and its working:
What Is Secure Boot?
The UEFI specification defines a security feature known as a secure boot for Windows 8, 10, and 11, and also for Linux.
This boot secures the operating system from viruses or malware by stopping the function of unauthorized software or programs.
When you enable secure boot on Windows 11, it ensures that only trusted software (with approved keys) is allowed to execute.
In other words, enabled secure boot will verify every software’s digital signature before allowing it to run on your computer.
In contrast, the software or programs with blacklisted/unauthorized keys are restricted from executing their function in your OS.
With this security feature, your computer is secure from viruses and malicious software, preventing cyber attackers from taking over the OS/machine.
Moreover, it’s also used for data encryption, intrusion detection, and many other security features to make something more secure.
Enough of the introduction! Now, let’s head to the working of secure boot.
How Does Secure Boot Work?
The first working step of secure boot is verification of the digital signature of any software.
Note: Digital signature, also known as an electronic signature, validates the authenticity and integrity of a file, program, or software.
In short, it ensures that a file, program, or software hasn’t been tampered with.
Certainly, the software is submitted to the certificate authority (your OS) for verification to get the digital signature. After verification, the authority provides it with a unique digital signature that further helps the software to execute on a computer.
Long answer short, when you try to run software on your computer, the OS verifies the digital signature and allows them to run when the secure boot is enabled.
Thus, this is what secure boot is, and its works on a computer.
Steps to Enable Secure Boot on Windows 11
To enable secure boot on Windows 11, you need not be a computer expert; just follow some simple steps to do so.
But, before heading to the steps, you have to enter BIOS or UEFI on your PC/computer, i.e., you need to change the computer’s boot mode to UEFI.
After that, follow the instruction to enable secure boot on Windows 11 that is linked below:
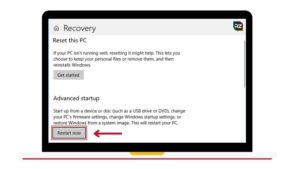
#1. First Step: Search Advance Startup and select the Change Advanced Startup Options.
#2. Second Step: In the new window, click on Restart Now button (under the Recovery > Advanced).
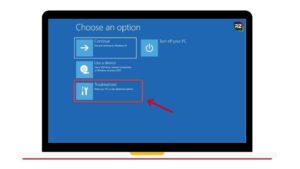
#3. Third Step: After restarting the computer, you’ll notice a Choose an Option screen. Select Troubleshoot option.
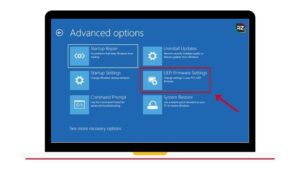
#4. Fourth Step: In Troubleshoot option, choose the Advance Option.
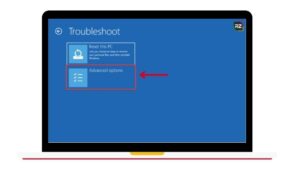
#5. Fifth Step: Select the UEFI Firmware Settings.
#6. Sixth Step: Now, the computer will Restart automatically in BIOS.
#7. Seventh Step: Choose the Security tab under the BIOS Settings.
#8. Eighth Step: After that, find the Secure Boot using the Up and Down keys and change its status to Enable.

Thus, these are the steps that you can follow to enable secure boot on windows 11 in user mode.
Note: It’s important to have the latest version of UEFI on your Windows 11 computer for better performance.
Conclusion
Secure boot is not a new feature to Windows computers, but it wasn’t mandatory in Windows 8, 9, and 10.
But to update your computer to Windows 11 and use it, you must first enable secure boot on windows 11.
The major concept behind the secure boot feature is to provide additional multi-level security to OS to prevent hackers take over your computer.
So, if you can’t enable secure boot on your own, follow the simple instructions mentioned above.
And if you have any queries, you can ask in the comment sections. We’ll help you ASAP.
FAQ
These are the frequently asked question about the secure boot and Windows 11, including:
#1. How to Enable Secure Boot in Windows 11 on hp Desktop?
The process to enable secure boot in hp desktop is the same as any other computer. The procedure includes:
#1. Search Advance Startup and go to the Change Advanced Startup Options.
#2. After that, click on Restart Now (under the Recovery > Advanced).
#3. Now, in the Choose an Option screen, select Troubleshoot and then the Advance Option.
#4. Select the UEFI Firmware Settings.
#5. Now, it’ll restart automatically.
#6. Select the Security option under the BIOS Settings.
#7. Lastly, find the Secure Boot and change its status to Enable.
Note: For more details, follow the instruction mentioned in the step-by-step guide.
#2. Does Windows 11 need Secure Boot?
Yes, Windows 11 needs secure boot to work properly. Moreover, you need to enable secure boot in windows 11 to upgrade your PC from Windows 10 to 11.
#3. How do I get UEFI on Windows 11?
Follow these steps to get UEFI on Windows 11:
- Go to Settings.
- Head to System > Recovery.
- Under the Advance Startup option, click on Restart Now.
- In the Advanced Boot Up, tap on Troubleshoot > Advanced options > UEFI Firmware Settings.
- Lastly, Restart the PC, and it’ll boot into UEFI/BIOS settings.
Thus, by following these steps properly, you’ll get UEFI on Windows 11.
#4. Is Secure Boot necessary?
If you’re not using Windows 11, secure boot is not necessary. On the other hand, if you use or want to update your computer to Windows 11, then secure boot is necessary. So, to enable secure boot on Windows 11, you can follow this guide.
Note: Sometimes, Windows 10 users may notice a common issue as windows 10 won’t boot with secure boot enabled. In that case, disabling it is more beneficial.
#5. Does Windows 11 Work with Secure Boot Disabled?
Windows 11 requires enabled Secure Boot as it provides multi-layer security to the computer from malware attacks from hackers or cyber criminals. So, if you haven’t enabled it yet, follow the step-by-step guide to enable secure boot on Windows 11 MSI.