How To Split OST File [Complete Step-wise Solution]
7 min read
Looking for a blog that can provide you with an effective solution or answer on how to Split OST File?? Well friend, welcome to our blog… Here we ensure you of providing a guaranteed working solution to this particular OST file issue.
We will not only provide you with a solution on how to fix the issue OST File Too Large… but will also brief you about OST files, problems encountered when they get large in size and etc.
However, if in hurry, you need to go through the note right below here:
To split the OST file, easily and quickly, Stellar OST To PST Converter Tool is the best way… It guarantees you of fixing issues like OST file splitting or OST File Tool Large and other similar issues.
OK… this was about the software which will fix your issue quickly: How To Split OST File.
Now we will show you, how this software works and other things related to it.
Before that, a quick glance at the role of OST files in MS Outlook and issues you may encounter when they get over-sized.
So, here we go…
MS Outlook, everyone knows, is one of the most popular email client applications…
In this Outlook application, the OST and PST data file holds an absolutely crucial place, as it does stores all the vital information in it.
An OST (Offline Storage Table) file is a backup replica of all the data available in the Exchange server.
The OST file size limit varies, according to the Outlook version installed in the system. This size variation is the actual reason, why the necessity of splitting the OST file arises.
Outlook Data File Size Limits
Versions | File Size Limit |
| Outlook 2002 & Older Version | 2GB |
| Outlook 2007 | 20GB |
| Outlook 2010 and Later Versions | 50GB |
Besides, we have notified numerous Outlook users with queries about Office 365 OST File Size Limit… so here’s the answer to it: a Unicode PST or OST file can grow as large as 20GB in Outlook 2007 and 50GB in Office 365.
Now, whenever the OST file exceeds its defined size limit, you start encountering issues, and the need arises to split it.
Here below, know in detail why you need to split the OST file. This is important to prevent such issues… So,
Why Need Arises To Split OST File?
Your presence on this blog clearly indicates that you are well aware of OST files.
But still, just briefing…
OST file contains the data that has been created or received since the time account got created. The data include contacts, emails, calendars, notes, tasks, hidden items and etc.
So, all this works very coolly… but at a time when the mailbox gets loaded with insignificant mails, the size of the OST file enlarge tremendously. This ultimately results in degradation of the overall Outlook application performance.
Thus, in this situation (or you can say to deal with this situation), it’s wise or crucial to split the OST file.
You Might Refer Reading: How To Fix Outlook Error ‘OST File is Not Updating’
Problems Encountered Due to Large-Sized OST File
- Huge degradation in Outlook performance
- The frequent occurrence of issues like Outlook Freezing or not responding
- Delay in sending and receiving new mails.
- Synchronization errors
Ok.. here all associated things end up…
Now coming very quickly on How to Split OST File
How to Split OST File?
There are some other manual measures also, besides from usage of software, to split the OST file…
Firstly have a quick glance at them…
Method #1: Disable the Add-Ins
In this method, one needs to disable all the add-ins, enabled in the MS Outlook application.
By doing this, Outlook performance is enhanced, in terms of receiving and sending the emails.
Because of this reason, this method is often referred to as a better option than that of splitting the OST file.
Now in order to disable the add-ins, you’re required to follow the set forth steps:
- Firstly, launch the Outlook application and then click on File Select Options and hit the Add-ins option.
- Select the Manage option and choose COM Add-ins from the drop-down list. Click Go
- Now you need to deselect the unnecessary add-ins, which are currently not in use.
- Once all the un-required add-ins selected, hit the OK This will increase the Outlook application’s overall efficiency, instead to split the oversized OST file.
Method #2: Archive the OST Files’ Data
In this method, the OST file is archived. This helps in reducing the OST file size.
Actually, when the OST file is archived, it is prevented from exceeding the default size limit.
You need to follow the set forth steps to archive the OST file in an effective manner:
- Firstly, launch the Outlook application. Now go to File>> Cleanup Tools >> Mailbox Cleanup
Note: This is an alternative method to split OST File
- Now there are two distinct options, you can go for…either use the AutoArchive option, which will help transfer all the old items from the mailbox to the archive folder. Or you can delete all the items from the Deleted items folder by clicking on the Empty folder.
Ok… so these were the manual methods to split the OST file. Now though these methods work… but there are some issues associated with them… Firstly they are tedious of course (especially for the novice PC users) and secondly time-consuming for all, no matter one is a novice or experienced PC user. Moreover, with these manual methods, you cannot back up an inaccessible or orphaned OST file.
So, to stay away from all such complications and to get the OST file splitting done quickly, it’s always better or the best to go for Stellar OST To PST Converter Tool. This software absolutely comes in handy.
Thus, the third and ultimate method is using Stellar OST To PST Converter Tool to split OST Files.
Method #3: Stellar OST To PST Converter Tool
Stellar OST To PST Converter Tool not only converts inaccessible/orphaned OST into PST file but also enables splitting the converter file into multiple PSTs.
So, the software is also the best to fix issues like Outlook PST File Too Large or Reduce Size PST File after Archiving or Compact PST File without Opening Outlook.
Note: Have come across many Outlook users with queries about Outlook PST File Size Limit. Have answered this query above. But once again… the PST file can grow up to 20 GB in Outlook 2007 and 50GB in Outlook 2010, 2013, 2016, 2019, and Office 365.
How to Split OST File with Stellar OST Converter Tool
Step 1: Firstly, download, install and run Stellar OST To PST Converter Tool
Step 2: Now from the software main interface windows, click Browse or Find to select the OST file(s) you wishes to convert and split
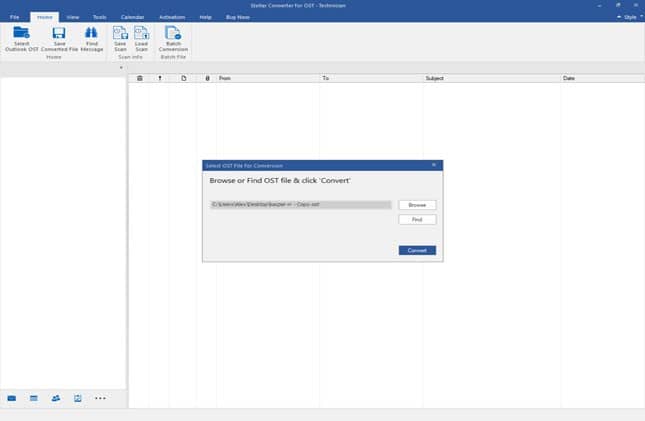
Step 3: Click Convert to proceed with the conversion process.
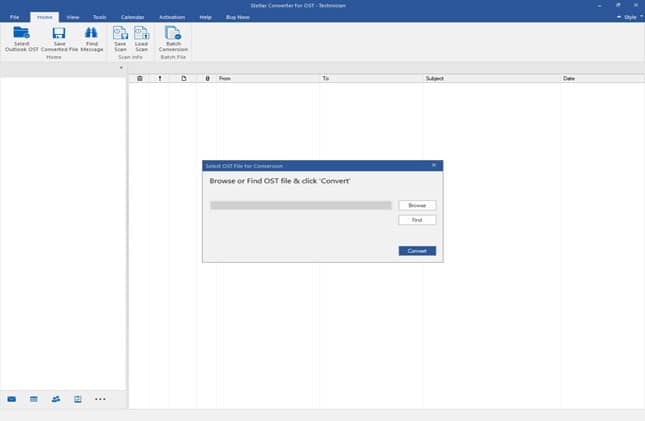
Step 4: The software will show the preview of the converted mailbox data. Here select the mailbox data, which you wish to convert and split into PST. Click Save Converted File from the main menu.
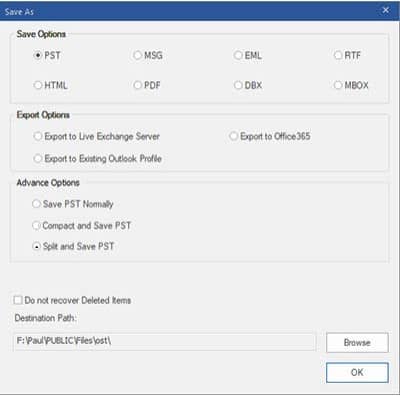
Step 5: From the Save As dialog box which opens, choose Split and Save PST under the Advance options section.
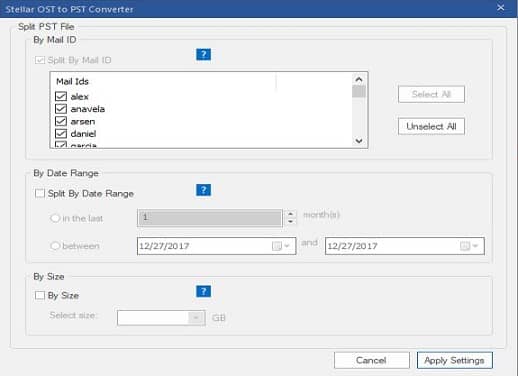
Step 6: Now from the Split PST File box, you can choose either of the below-mentioned options to split the resultant PST file:
Split by Mail ID
To split the file according to the respective email ids, from the ‘Mail ID’ section, choose mail ids from the drop-down list. Alternatively, you can use the Select All/Unselect All buttons for selecting/unselecting all the email ids.
Split by Date Range
Select Split by Date Range checkbox under the ‘By Data Range’ section. Next select the in the last checkbox to split the PST file by months or choose the start and end date to split it, according to a specific period.
Split by Size
Ensure that the By Size Checkbox is checked in the ‘By Size’ section. Now select a size from the dropdown list to split the PST file, accordingly the predetermined sizes: 5 GB/10 GB/20 GB/30 GB or 50 GB.
Notes:
- The Stellar OST Converter Tool automatically splits the new PST file into small sizes, depending on the Outlook version installed on the PC. For Outlook 2007, the new PST splits to approximately 18 GB size. However, for Outlook 2010 or above, the new PST can be split at approximately 45 GB – 48 GB of size.
- You can select all the three split option checkboxes (By Mail ID, By Date Range, and By Size). The software will queue them and will split the PST files, using all the three methods.
Step 7: Click the Apply Settings button to return to the Save As dialog box.
Step 8: Click Browse, in order to select the destination, where you wish to save the PST file. Now click OK.
Step 9: Click OK, once done with the splitting process.
The converted file will now get saved as multiple PSTs in the selected location.
Final Sum Up
When the OST file gets tremendously large than its default size, the need for a splitting OST file arises. Considering this particular aspect, here some methods have been provided to do that. Methods listed include both Manual and Automatic.
Now though manual work, however, often leads to some issues. So, to stay away from all those issues and successfully split the OST file, an automated method or solution is the best.
The tool is embedded with highly powerful as well as enhance algorithms, providing an easy-to-use interface to all the end-users.
So, here blogs end up finally on how to Split file or how to address issues like ost file too large or compact ost file or archive ost file. Hopefully, you enjoyed reading it and the info discussed was beneficial for you.
The same sort of blog will be updated in the future. So stay tuned…
Thanks!!

