5 Ways to Crop a Screenshot on Your MacOS
5 min read
Many people search for how to take and Crop a Screenshot on Mac. It is because, people don’t know about the release of Mojave on Mac.
Moreover, MacOS also has a built-in snipping tool to take screenshots just like windows because of the Mojave update.
Certainly, capturing and editing screenshots is a no-brainer, you can take a screenshot easily on your Mac with some simple key buttons and a few clicks.
In addition, the screenshot you take is by default saved in your Images files on your Desktop.
Therefore, after taking a screenshot, cropping removes the unwanted portion of the image.
And you can edit your screenshot by selecting the portion you want in your image and creating the focus on a particular object in the screenshot.
So, if you want to know how to screenshot on MacBook air and how to crop a screenshot on MacBook air, stick with us.
Keyboard Shortcuts on How to Screenshot on MacBook Pro
Before going on how to Crop a Screenshot on Mac, you must know how to take screenshots first.
Below are some of the keyboard shortcuts on how you can take a screenshot on a Mac.
- Press “Command+Shift+3” for capturing a screenshot of your whole screen.
- To choose and capture some of the screens, press “Command+Shift+4.”
- For capturing a window or menu, press “Command+Shift+4+spacebar.”
- You can use the toolbar to take screenshots, press “Command+Shift+5” to open a screenshot toolbar.
After taking screenshots, let’s move on to the next section and see how you can Crop a Screenshot on Mac.
How to Crop a Screenshot on Mac
Below are some of the ways you can crop your image irrespective of your MacBook Air or MacBook pro.
1. Using the Preview Tool on Mac

You can edit or crop your screenshot using the preview tool on your Mac.
Moreover, here are the ways on how to crop a screenshot on mac preview.
Follow these steps:
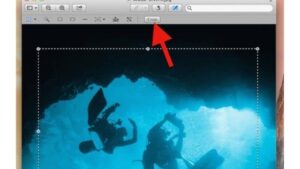
- Double click on your screenshot and open it in the “Preview app”.
- Find and click on “Show Markup Tool” in the top-right corner.
- After that, click and drag the portion you want to select in the image.
- Now, form the “Menu-bar” press on “Tools” and then select “crop” from the drop-down option.
2. Using MacOS Built-in Cropping Tool
You can easily use built-in features to Crop a Screenshot on Mac.
Follow the steps to crop the image.
- Press “Command+Shift+3” to take the screenshot.
- Double click on the notification that popped in the bottom right corner of your screen.
- Now, click on “edit” in the upper right corner.
- After that, select “crop” in the toolbar and crop the image easily.
- Later, just press “done” and save your image.
3. Using a Photo Editor on Mac
Crop your screenshots by using the in-built Photo editor tool.
However, before using the photo editor tool, you need to save your screenshot.
Follow the steps to Crop a Screenshot on Mac using the photo editor tool.
- Open the “photos” and then go to “”
- Now, go to “import” and search got the screenshot you want to crop.
- After that, Press on “import”.
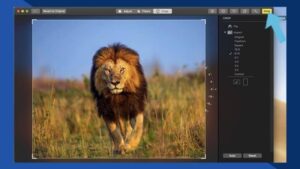
- Now, double-click on the image and open it.
- Select the “crop” button at the top and select the image.
- Now just Press “”
4. Using Keyboard Shortcuts
You can also use the mac crop screenshot shortcut to cut or crop your images.
Moreover, it is one of the easiest and most convenient ways to crop the screenshot on your Mac.
Follow the steps to crop the screenshot:
- Press the “Command+Shift+4” keys on your keyboard.
- Now, drag the crosshair and select the part of the image you want to crop.
- After that, release the mouse button to take the cropped screenshot.
- The screenshot will be successfully saved on your device.
5. Free Online Cropping Tools
Using online free tools is another way to crop your screenshot on Mac.
Indeed, here is how you can find one of the best free tools that you can use on your Mac.
Follow the steps given below to crop your image.
- Go to your browser and search for “Pic Resize.”
- Click on the first link and open the page.
- Now, upload your image to the editor you want to crop.
- After that, use the tools to edit your images like rotate, flip, etc.
- Click on the option “I’m done, resize my picture”.
- In the end, download the image you cropped.
Hence, these are some of the ways you can easily crop your screenshot on Mac OS.
Conclusion
In the above sections, we have talked about the different ways to take and crop a screenshot on Mac.
For instance, you can use the in-built feature of a mac, mac photo editor, or more to crop screenshots.
However, using keyboard shortcuts is the simplest and easiest way for cropping among all of them.
Hope you find these methods useful and helpful to take and crop a screenshot on a mac.
FAQs
Here are the questions that people often ask:
#1. Why Can’t I Crop a Screenshot on Mac?
There can be various reasons why you can’t crop your screenshots. However, having outdated MacOS, bugs, or glitches in your preview app can be the main reason behind your problem.
#2. How Can You Screenshot on Mac for Free?
You can use the in-built feature of the mac to take screenshots for free. Press “Shift+command+3” simultaneously. Later, click on the thumbnail that appears on the screen to crop the image.
#3. How to Crop Screenshots on Your PC?
Well, you can use the “prt src” key [Print screen] button to take screenshots on your windows pc.
#4. How Do I Take a Screenshot of a Certain Area on Mac?
To take a screenshot of a certain area, press “Command+Shift+4”. Further, drag the crosshair pointer to the area you want to select and release it to crop the image.
#5. What Is a Shortcut to Crop Pictures on Mac?
Double click on the photo in the photo app on mac. After, click “edit” in the toolbar and then click “crop” in the toolbar option. This way, you can crop your pictures easily on mac.