How to Redirect OST File to Network Share?
7 min read
Do you have any idea how to direct OST file to network share? If you are looking for methods to accomplish the task, then you are in the right place. Follow this technical blog to analyze the methods on how to redirect OST file to network share?
In addition, we will also give you a brief introduction to the handy software named Stellar OST to PST Converter Tool.
About MS Outlook & OST Files
Microsoft Outlook is considered the most popular mail client application as it acts as your personal manager. But you must have encountered some problems related to space or mailbox items. Outlook accumulates the OST (Offline Storage Table) file on the system storage by default.
However, due to some storage or space concerning issues, you might require to place the location of the OST file to a different spot or redirect the OST file to a mapped or network drive. Alternatively, in this blog we will give you a few methods on how to redirect OST file to network share? and that too without leaving behind any mailbox items.
The Offline Storage Table or OST file is a local copy of mailbox data on the server that enables you to operate MS Outlook even when your operating system is in offline mode and the Exchange Server is down either because of temporary unavailability of the server or it is under maintenance. However, as you share or receive large or multiple attachments through email, the size of the OST file may notably grow large with time-based on your usage. As a result, it will eat up a lot of your storage space on the C drive. This is the time when you have to either upgrade the hardware or move OST drive to a different partition or the network drive.
Based on the MS Outlook version that you have installed on your system the default Outlook OST file location Windows 10 might be any one of the following two:
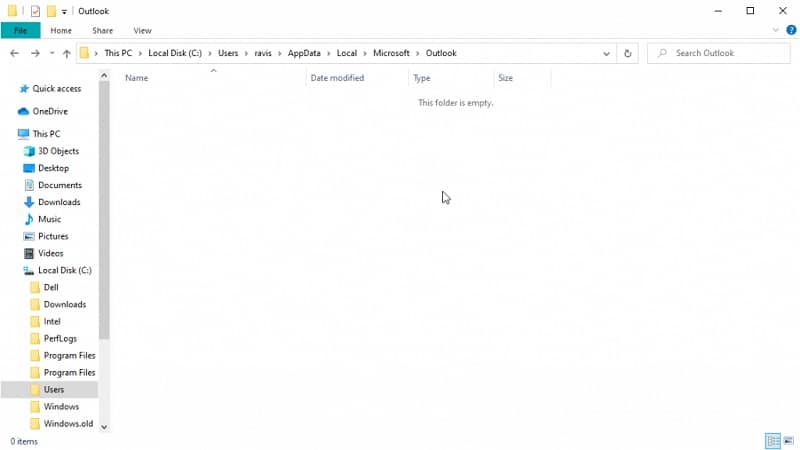
- C:\Documents and Settings\Local Settings\Application Data\Microsoft\Outlook
- C:\Users\AppData\Local\Microsoft\Outlook
Methods: How to redirect OST File to Network Share?
You cannot change the location of the offline Outlook data file OST in MS Outlook because of the deprecation of the classic offline mode in Outlook 2013 and later versions. You will notice that the ‘Browse’ button in the offline folder file setting Outlook 2016 or Outlook 2013 is disabled. Utilize any of the following methods.
Method 1: ForceOSTPath Registry Values
It is quite troublesome to move IMAP OST file Outlook 2013 or change the location for an Exchange, Outlook.com. Therefore, the location of the OST files can be forced via the Registry value. If you have the possibility of removing then re-adding your account, and also downloading all the emails again from the mail server, then use the ForceOSTPath Registry value.
- Open run. To open the Registry Editor page type ‘regedit’ and press ‘Enter’.
- Follow this path: HKEY_CURRENT_USERS\Software\Microsoft\Office\XX.0\Outlook. The ‘XX’ value changes with the Outlook versions.
- Select ‘New’ and then ‘Expandable String Value by right-clicking on the Outlook option.
- Type ‘ForceOSTPath’ as a name.
- Hit ‘Enter’ and then right-click on ForceOSTPath.
- Press the ‘Modify’ option.
- Under ‘Edit String’ enter the path location and click on ‘OK’.
- You need to maintain careful execution of each step to avoid ForceOSTPath not working.
Method 2: New File Creation [Create New OST File Outlook 365]
You can try to create new OST file Outlook 365 to move all the data to this newly created file with the Exchange Server configuration:
- Open Outlook and navigate to: File>Account Settings>Data Files.
- Choose the ‘Exchange’ account and press the ‘Setting’ option.
- Go to the ‘Advanced’ tab, Untick the ‘Use Cached Exchange Mode’ option, and hit ‘OK’.
- Press ‘Outlook Data File Settings…’ and then ‘Offline Use Option’. Click on ‘Yes’ to confirm.
- Now, select the ‘Outlook Data file Settings’ and choose either of the two options.
- In ‘I want to create a file (default)’, browse and add the path location to save the new OST file. Click on ‘Open’ and ‘OK’.
- Again in the ‘Advanced’ tab, tick the ‘Use cached Exchange Mode’ checkbox and click on ‘OK’.
- Restart the Outlook application.
Method 3: Use the Group Policy Object (GPO)
GPO, a collection of Group Policy settings can be used to define script options, security options, installation or maintenance options, and folder redirection options to move the OST file to a network share. It shows how the system will behave for a group of users.
However, you have to download the Group Policy Administrative Template files (ADMX/ADML) according to your MS Office or Outlook version. Now just follow the following steps:
- Click on ‘AdminTemplates_32.exe’ or ‘AdminTemplates_64.exe’ based on your system configuration to load Group Policy Administrative Template files.
- Direct to the ‘Group Policy Management Console (GPMC)’.
- Right-click on the ‘Group Policy Objects’ after expanding the ‘Domains’.
- To open the Group Policy Management Editor, select ‘Edit’.
- Now follow the direction: ‘User Configuration>Policies>Administrative Templates>Microsoft Outlook 2016>Miscellaneous>PST Settings’.
- Press ‘Enabled’ after choosing ‘Default location for OST files’.
- Finally, enter the network shared location path and press ‘OK’.
It should be noted that the OST file location will be changed for all the users in a particular group. Hence, you should remove the user who does not want to redirect the OST file to the network share.
Method 4: Use Symbolic Link
To re-point the OST file on a network drive location or an external hard drive, you use a symbolic link which is done at the File System level. By using the MKLINK command you can generate an NTFS symbolic link to redirect the OST file to another file system.
Although, redirecting the OST file from its default location can give rise to several problems such as frequent disconnection due to network issues, synchronization error, and so on. So to prevent OST file damage it should be avoided.
Nevertheless, you can take the aid of Stellar OST to PST Converter Tool if the sole purpose of your redirecting is for saving the storage space. This software has the potential to convert the OST file containing the mailbox data to PST with 100% precision. Besides, you can store the created PST anywhere and open it in MS Outlook without any synchronization or network errors. It allows the conversion and extraction of 20 emails per folder.
Additionally, the Stellar Converter for OST also provides you with advanced options to reduce the OST file size. It splits the OST file and stores the attachments in a different folder.
Furthermore, this tool is capable of opening and converting an orphaned or inaccessible OST file to EML, MSG, RTF, PDF, and HTML formats other than PST. You can also use this software to export the mailbox items from such OST files directly to Office 365 account, Outlook profile, or to a live Exchange. Along with a free demo version, the software comes with three editions: Corporate, Technician, Toolkit.
Now to redirect the OST file to a network shared location by using a symbolic link follow the directions given below:
- Firstly, place the OST file to the network drive location from its default location. You can either choose to copy & paste or cut & paste.
- Secondly, delete the OST file from the default location.
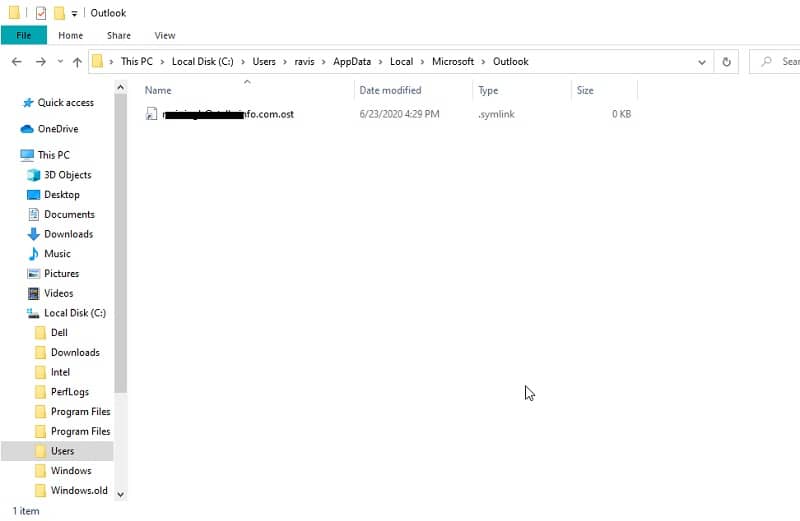
- Launch Command Prompt as an administrator and execute the following command: ‘mklink\Users\user\AppData\Local\Microsoft\Outlook\abc@domainname.com.ost\”\\fileserver\users%username%\Files\abc@domainname.com.ost”’
The following success command will be displayed in the Command Prompt window: ‘symbolic link created for C:\Users\user\AppData\Local\Microsoft\Outlook\abc@domainname.com.ost <<===>> \\fileserver\users%username%\Files\abc@domainname.com.ost’
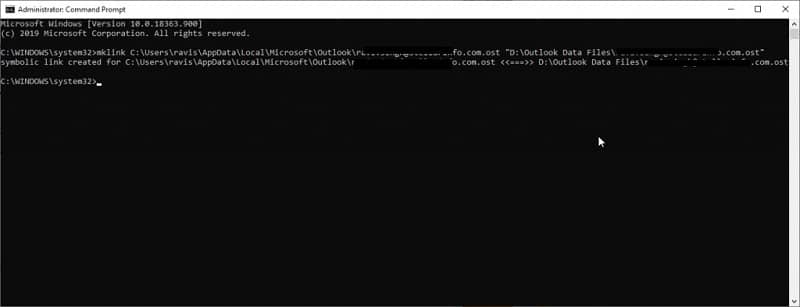
Now if you will check the default location… you will find a symlink file for the OST file for the user account abc@domainname.com.ost.
You must note that the symbolic link may break due to the disconnection of the connected external drive or network drive. You need to take care of it otherwise it will lead to the inaccessibility of the OST file and various other errors.
Conclusion
We are delighted to share with you the above-mentioned methods on how to redirect OST file to network share? One of these might possibly solve your problem. However, it is usually not recommended even if you can relocate the OST file to a network share drive or location. This drastic change can result in several issues. If your internet connection is not reliable it might disconnect the OST file with Outlook. You will then face Outlook performance issues like it may crash or not respond and get stuck.
In such cases, you might run the risk of losing all your data permanently if the unsaved data is not synced to the mailbox on the server. This is when Stellar OST to PST Converter Tool comes in handy. It can perform a successful recovery of the mailbox items and also restore the deleted emails. Buy it today to fetch some amazing results.